
How to Work Schedule Events in WordPress
What Are WordPress Scheduled Events?
There is a wide range of tasks crons can be used for in WordPress. Some of the most popular examples include:
- Checking for updates
- Publishing scheduled posts
- Deleting old comments from the trash
- Automatically creating backups
Also, scheduling recurring events eliminates the need to remember to perform the functions yourself. This can improve the overall security and performance posture of your site, particularly when it comes to critical tasks such as running backups and updates.
These tasks cannot be scheduled as pure server-level Cron jobs because WordPress does not have access to that type of server-level operating system privileges.
So, since true Cron jobs are not available, WordPress created its own way of running scheduled tasks in the background – WordPress scheduled events.
How Do WordPress Scheduled Events Run?
WordPress has a lot of great tools in its armoury that it uses to mimic Cron jobs.
- Action Hooks
- Filters
- Transients
- HTTP Requests
Let’s walk through exactly how WordPress creates these automated tasks.
- WordPress adds an action to the init action hook to run the function. This function is mainly run on every page load so it must be extremely efficient.
- The
wp_cronfunction runs a few sanity checks before retrieving all know scheduled events from the cron option. - Once all of the scheduled events are retrieved, wp_cron calls the
spawn_cronfunction on each event. - The
spawn_cronfunction does some more sanity checks before executing the respective event function via thewp_remote_postfunction.
This all happens behind the scenes and WordPress gives developers access to this functionality through the wp_schedule_event function.
Schedules a hook which will be triggered by WordPress at the specified interval. The action will trigger when someone visits your WordPress site if the scheduled time has passed.
The Main WordPress Cron Hook: wp_schedule_event
So first we’ll start to understand how to create wp corn job by understanding that function name of wp_schedule_event.
wp_schedule_event( int $timestamp, string $recurrence, string $hook, array $args = array() )So, those parameters in more detail:
$timestampis meant to be the first time you want the event to occur. So the most common value submitted here is the current time. You get that in PHP with thetime()function.$recurrenceis a string value saying when you want the event to run. By default, WordPress expects the valueshourly,twicedailyordaily. As we’ll show off in just a bit, you can make awp_schedule_eventregistered events run on a different schedule than those three, but those are the most common by far.$hookwill be the (name of the) function you want WordPress to call when your event runs. This is a string like'cbxwoodlaccessexpiryalert_daily_order_expiry_next'where your function is calledcbxwoodlaccessexpiryalert_daily_order_expiry_next.$argsis any argument(s) that your$hookfunction will need to see when called. We won’t see it in many examples, but it’s good to know you can pass them.
Making wp_schedule_event Daily Run Your Function
Now that we have a sense of how to call wp_schedule_event, let’s see it used in context to schedule a function we made up called cbxwoodlaccessexpiryalert_daily_order_expiry_next to run every day. In a plugin, that might look like:
/**
* Plugin activation hook
*/
register_activation_hook( __FILE__, 'activation' );
    function activation() {

      if ( ! wp_next_scheduled( 'cbxwoodlaccessexpiryalert_daily_order_expiry_next' ) ) {
      $alert_time_next = '08:00:00'

      wp_schedule_event( strtotime( $alert_time_next ), 'daily', 'cbxwoodlaccessexpiryalert_daily_order_expiry_next' );

}

}//end activation
register_activation_hook triggered when the plugin is activated and will activate our cron job. The PHP function strtotime means “make this string into a time.” So it returns the same sort of value as time, but lets us use a more specific way. So this task will first run at 08:00:00 tomorrow morning and not right now. And then, because we’ve set the $frequency to 'daily', it should keep recurring every day at 8am. The downside to consider: if your users will have needed/wanted this to happen right away, you’ll want some other system to do that for them too. Which could be wp_schedule_single_event.
And the third argument is the function hook which will actually call the original function cbxwoodlaccessexpiryalert_daily_order_expiry_next. The action will trigger when someone visits your WordPress site if the scheduled time has passed. And it will run cbx_daily_order_expiry_next_trigger and send an email.
add_action( 'cbxwoodlaccessexpiryalert_daily_order_expiry_next', 'cbx_daily_order_expiry_next_trigger' ) );

function cbx_daily_order_expiry_next_trigger(){
    wp_mail('you@example.com', 'Test Email', 'Hello, this is a test automatically scheduled email from WordPress.');
}
What’s wp_schedule_single_event ?
Sometimes you’ll want your event or scheduled code to happen just once, and “not now.” So how do you schedule something to run once in WordPress? There’s a function called wp_schedule_single_event for that.
Schedules a hook which will be triggered by WordPress at the specified time. The action will trigger when someone visits your WordPress site if the scheduled time has passed.
As you might guess, it works pretty similarly to wp_schedule_event. wp_schedule_single_event is called just like this:
wp_schedule_single_event( strtotime( '08:00:00' ), 'cbxwoodlaccessexpiryalert_daily_order_expiry_next' );You’ll notice that this example code for wp_schedule_single_event looks familiar. What’s different? We lose the second “recurrence interval” that you’ll see on wp_schedule_event. Which makes perfect sense, because that _single_ in the name of the function makes it pretty clear that an $interval doesn’t really make sense. Other than that, everything is pretty similar in wp_schedule_event and wp_schedule_single_event code samples.
Clean Up After Yourself: wp_unschedule_event
If you’ve gone the path of rooting your scheduled task to the plugin being activated, you may also want to make sure that your task doesn’t cause an error if your plugin is turned off (deactivated). To do that, you can unset your scheduled event when they deactivate the plugin. That’d look like:
register_deactivation_hook( __FILE__, 'deactivation')
  function deactivation() {
    $timestamp = '08:00:00'
    wp_unschedule_event( $timestamp, 'cbxwoodlaccessexpiryalert_daily_order_expiry_next' );
}
As you might have guessed, wp_clear_schedule_hook will just un-register the $hook you’ve scheduled with a call to wp_schedule_event.
How to Execute a Event With a Plugin For Test Our Code

To test our code we can use Advanced Cron Manager Plugin. you can Execute your event immediately instead of waiting for the indicated schedule. With Advanced Cron Manager you can modify, add, delete, and run WP-Cron events.
You can also manually execute, pause, or unschedule any event. In addition to individual and recurring tasks, you can use the plugin to customize your job schedules.
You can install Advanced Cron Manager directly from your admin dashboard or download it from the WordPress Plugin Directory then upload it to your site. Once you’ve added it, be sure to activate it.
After you install and activate the plugin, you can find it under Tools in your admin dashboard. When you click on Cron Manager, it will bring you to an overview where you can view all your scheduled WordPress cron tasks:

It will tell you what each event is, its schedule, and the next time it’s set to run. To the right, you’ll have the option of enabling a server schedule. You can also filter tasks by intervals. For example, you can see which jobs occur hourly, daily, etc.
Under each event, you’ll find four links. If you click on Details, you’ll see a dropdown box where you can learn more about the task. The next link is Execute Now, which you can use to run the event immediately instead of waiting for the indicated schedule. The Pause link lets you suspend the task until you decide to run it again.
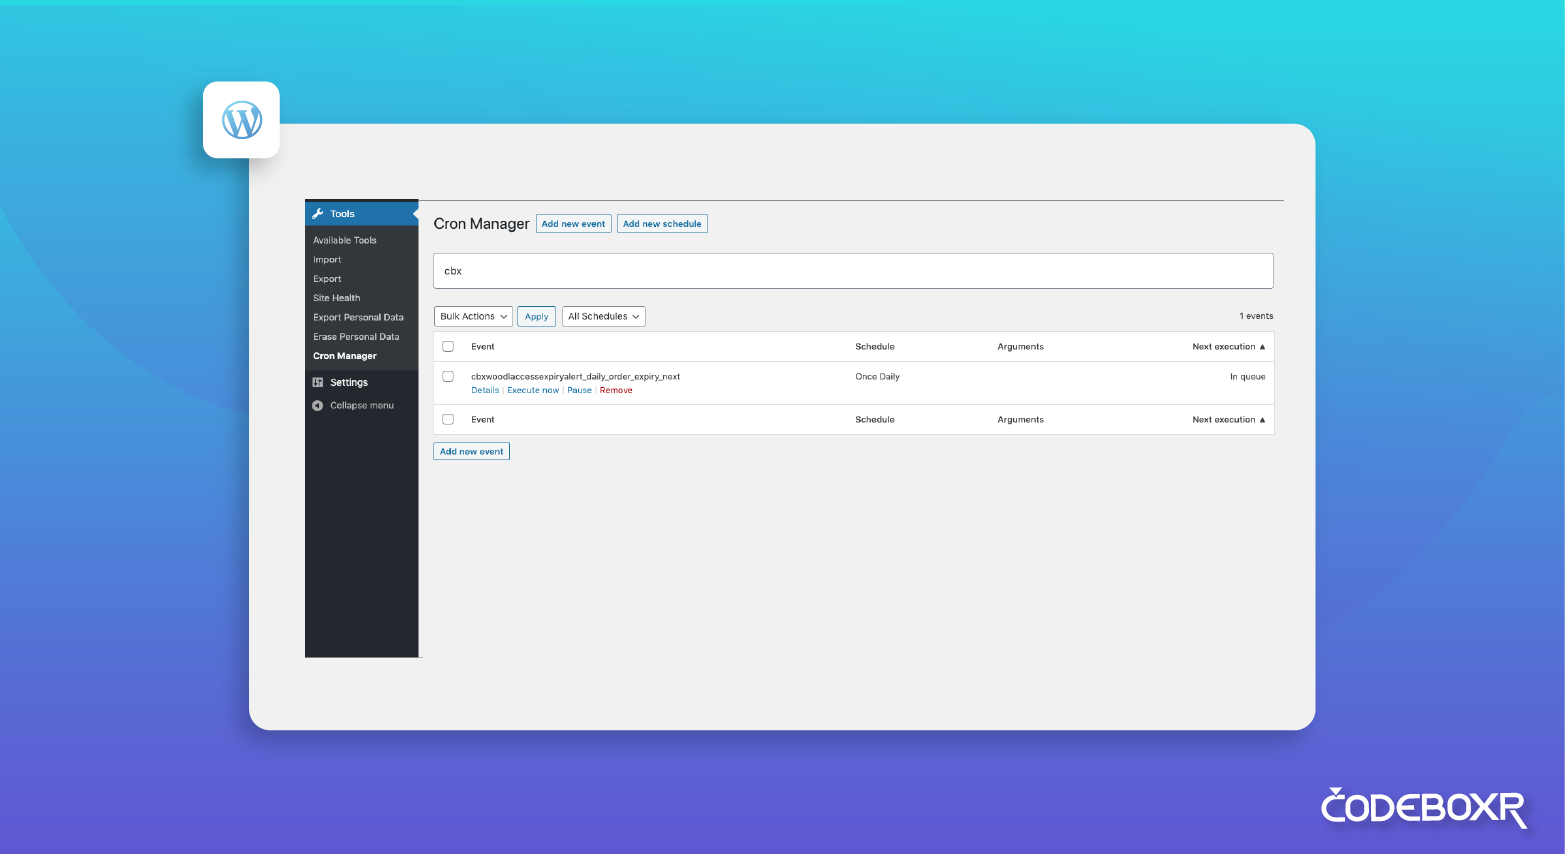
Finally, you can click on the Remove link to take the event off your schedule or eliminate it from your WP-Cron system entirely. You can perform Bulk Actions to either Execute Now for all tasks or Remove them simultaneously.


